I really prefer to color eggs that are blown. I love keeping them from year to year. BUT, I really dislike blowing them. Not because I am grossed out. It is just hard to do. I am picky about the size of the hole and if you have ever blown eggs before you know the smaller the hole the more sore your cheeks get.
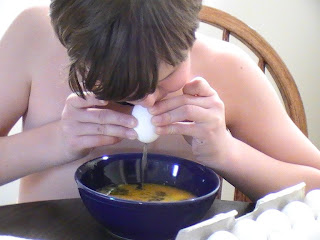
 Anyway, last weekend I blew 10 eggs and this weekend I had about 16 more that needed blowing. SO, I recruited Manny. He did awesome. After getting over being grossed out that he might get raw egg in his mouth, he jumped right in. I will let you in on something though, the stinker was making big holes. Oh well. I was happy to have help.
 Here comes the goo.
 These are unwashed. I get a little fanatical about raw eggs. I rinse the eggs out really well and then I soak them in HOT bleach water, making sure some gets inside the egg. Then I let them air dry.
 Then we eat. Two weekends in a row we have had scrambled eggs one day and french toast the other. Yum!
 Then we color. Johnsie made a ton of green ones.
 Manny got more creative. He used multiple colors and crayon resist designs.
 Dad was having fun too.
 Notice the boys are on the skins team. I didn't want stained shirts. Or pants either in Johnsie's case.

 We dried the eggs on toothpicks poked into the egg carton.
 We even tried some sticker resist ones. We did learn that it works much better when the egg only sits in the dye for a short time. Otherwise, your stickers loosen.
 Some of our eggs. You can see some of the sticker resist ones.
 Here are some tissue paper ones.
 And foiled ones. The dye package we bought was called, Bright and Shiny eggs. It came with special glue and colored foils. Cool!
 And I made these rubber band ones. I have no clue how the orange got on the green one. I first died it yellow and then added the rubber bands and then dipped it in blue. Orange? It's really cool though.
Just a note: Always break the yoke before you start blowing. It makes it way easier.
 Anyway, last weekend I blew 10 eggs and this weekend I had about 16 more that needed blowing. SO, I recruited Manny. He did awesome. After getting over being grossed out that he might get raw egg in his mouth, he jumped right in. I will let you in on something though, the stinker was making big holes. Oh well. I was happy to have help.
 Here comes the goo.
 These are unwashed. I get a little fanatical about raw eggs. I rinse the eggs out really well and then I soak them in HOT bleach water, making sure some gets inside the egg. Then I let them air dry.
 Then we eat. Two weekends in a row we have had scrambled eggs one day and french toast the other. Yum!
 Then we color. Johnsie made a ton of green ones.
 Manny got more creative. He used multiple colors and crayon resist designs.
 Dad was having fun too.
 Notice the boys are on the skins team. I didn't want stained shirts. Or pants either in Johnsie's case.
 We dried the eggs on toothpicks poked into the egg carton.
 We even tried some sticker resist ones. We did learn that it works much better when the egg only sits in the dye for a short time. Otherwise, your stickers loosen.
 Some of our eggs. You can see some of the sticker resist ones.
 Here are some tissue paper ones.
 And foiled ones. The dye package we bought was called, Bright and Shiny eggs. It came with special glue and colored foils. Cool!
 And I made these rubber band ones. I have no clue how the orange got on the green one. I first died it yellow and then added the rubber bands and then dipped it in blue. Orange? It's really cool though.
Just a note: Always break the yoke before you start blowing. It makes it way easier.


2 comments:
I'll have to try the sticker resist, hadn't tried that one before.
So, you only dye blown eggs, interesting.
This blown egg dying process seems to be 'the thing' on several of the blogs I read. I love it (cuz how many hard boiled eggs can one eat? lol). Are they more fragile while doing the color process? Thanks for sharing your variety of design ideas, what fun!
~Sheri
Post a Comment